When you’re learning how to shoot a bow and arrow, step one is masterning the proper archery stance. Proper stance is more than just where you place your feet. It goes all the way from your head to your toes and involves a lot of attention to detail. That’s why we’ve devoted this entire guide to it, specifically for beginners who need to learn how to stand.
The Neutral Stance: Best for Beginners
There are actually a few different stances that archers use, but the best one for beginners is called the “neutral stance.” It allows beginners to perfectly create a solid base, firmly draw the bow, and aim accurately. Here’s how you do it:
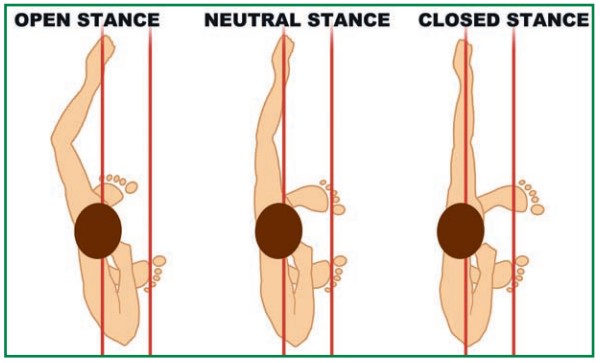
Note the subtle differences between the neutral, open, and closed stances.
IMPORTANT: Practice your stance a few times without your bow before actually shooting an arrow.
Foot Position
You might shoot with your hands, but when it comes to your stance, nothing is more important than your feet. They provide stability, giving you a base from which to launch your arrow.
You should stand at a right angle to the target, perpendicular to the arrow, and set your feet shoulder width apart with your non-dominant foot first. In other words, if you’re right-handed, you should turn so that your left foot is first. If you are at a range with a shooting line, your front foot should be up against the shooting line running parallel to it.
In the neutral stance, your feet should be perfectly even. Other stances involve staggering your feet, but they’re more advanced.
Knee Position
Don’t lock your knees. Keep them slightly bent and relaxed so that your weight can shift with the shot.
Hip Position
Your hips should face forward with your feet. Your pelvis should be relaxed, but your core should be engaged so that your back isn’t arched, which could lead to injuries. Again, your goal is to have a flexible but stable base that will provide you with balance so you can aim and shoot accurately.
Torso Position
This is important. Your torso should be facing straight forward, not turned toward the target at all. Stand straight up straight, but don’t puff your chest out. Also, new archers sometimes have a tendency to lean towards or away from the target and sometimes even lean back. That can mess with your shot—and hurt your back. Relax.
Shoulder Position
Getting the correct shoulder position is arguably the most difficult part of mastering the proper archery stance. However, it’s important to try your best since your shoulders are the joints with the most torque placed on them, both from the shot and holding the riser.
The position of your rear shoulder is dynamic since you’ll use it to draw the bowstring. If your arm is positioned correctly, it should fall into place naturally through the draw.
The front shoulder is more complicated. After all, it is essentially the point of balance of the entire shot. The key is to relax the shoulder and let it sit naturally. Beginners often pull their shoulder back, forward or up, and this tension can throw off the shot.
Arm and Hand Position
Your front arm is called your “bow arm.” This elbow should point out and slightly down away from the bow. Make sure not to point it directly downward because this can increase wrist slap. Additionally, bend your bow arm just a bit so that your elbow isn’t locked out.
With your bow arm positioned as stated, your hand will likely naturally grip the bow correctly. Nevertheless check that your thumb wraps around the bow at a 45-degree angle from your arm.
As for the rear arm, which is called your “release arm,” imagine your elbow creating a straight line between its point and the target at full draw. The forearm should be parallel to the ground.
Head Position
Head position is fairly simple. If the rest of your body is correctly positioned, you should be able to rotate your neck without changing the rest of your stance. When you’re ready to draw your bow, turn your face toward the target with your chin parallel to the ground and your head up straight.
Anchor Point
Your “anchor point” is the place on your face that you always draw the bowstring to. You can actually choose any point you want. Most recurve archers use the corners of their mouths while most compound archers use points on or behind their jaws. In the end, it doesn’t really matter where as long as you consistently use the same point.
The Importance of Relaxing
You may have noticed that we used the word “relax” a lot. There’s a reason for that: your best archery shots—all those thousands of bulls eyes you’ll get in the future—will likely be made when you’re relaxed and focused.
Tensing up ruins your balance, and that usually ruins your shot. That’s because the shot from the bow transfers energy into your body that your body needs to absorb like a spring without moving the bow. However, if you’re stiff, the energy would knock you off your feet, so you’ll instinctively move the bow instead.
Closed and Open Stances
A closed stance is one in which you stagger your feet with your front foot ahead of the rear foot. An open stance is the opposite, the front foot behind the rear foot. If you feel that you’ve mastered the other aspects of proper archery form and stance, you can start experimenting with these to see if they improve your shots.
Consistency Is Key
For whatever reason, people forget that just like every other part of the draw, stance is a habit that needs to be repeated again and again. If every aspect of your draw is perfect, but your stance is slightly different every time you shoot an arrow, you’ll never shoot accurately or consistently. Be mindful of not only using the correct stance but using the correct stance every time you shoot.
One thing you definitely want to avoid is forming bad habits. Even though it may take some time, as a beginner, go through a mental checklist of all the parts of stance we’ve discussed from head to toe. Eventually, it will come naturally, and you’ll see that you make consistent shots with the correct archery stance each time. In the meantime, though, be vigilant and don’t build any bad habits. They’ll only be that much harder to correct in the future.
Now that you know how to stand, it’s time to move on to how to shoot a bow and arrow step two: How to Nock an Arrow.
