In this post, I’ll describe how you should grasp your bow string. It’s not too difficult, but there a few different ways to do it, and you’ll want to get it right.
By the way, this is Step #3 in the “How to Shoot a Bow and Arrow” sequence, and you can jump back to the main page if you’d like to see the whole sequence.
Drawing, Mediterranean-Style
There are a couple of different styles of draw—there’s the pinch draw, the thumb draw, the three-finger draw, and plenty of others—but most archers you’ll see at the range or in a competition will use a three-finger draw (usually referred to as “The Mediterranean Draw”), and it’s the definitely the best draw for beginners.
It looks like this:
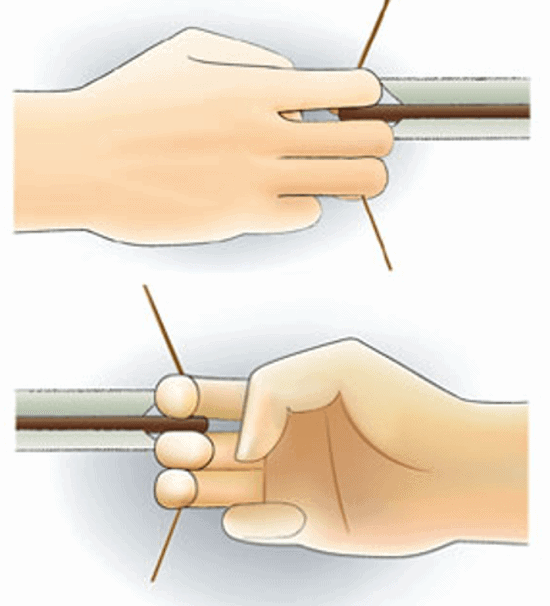
Basically, you’re trying to create a hook with your hand, so take your fingers and place the first joint of your fingers on the bowstring. Place your pointer finger above the arrow, and then put your middle finger and ring finger below the arrow. The thumb should be relaxed and down, not sticking up or out, and the pinky finger isn’t involved at all with the draw string, so that little piggy can relax for the time being.
A quick note: Some archers don’t put their first joint on the bowstring, and instead grasp the bowstring a little closer to their fingertips—but like everything in archery, there’s a lot of debate about the correct way to grasp the string. For beginners, grasping the string by your first knuckle joint will give you a little more control over the bowstring, so that’s the best place to start.
And… that’s it! You now know how to use the Mediterranean Draw to draw your bow. Easy peasy, lemon squeezy. Pretty simple.
A quick note: As I mentioned above, most archers use a three-finger draw, aka “The Mediterranean Draw,” where your index finger goes above the arrow, with your middle finger and ring finger placed below the arrow. That’s a good technique to start with. You may see some archers use the “three under” draw (sometimes called the “Apache Draw”), where the archer puts all three fingers underneath the arrow. It looks simple, but that draw can get a little tricky, so you may want to save for later.

There’s one other aspect about grasping the draw string that’s very, very important:
You Must Use Equipment to Protect Your Fingers
There are people who shoot with only their fingers touching the bowstring, and God bless ’em. Every time I’ve done that, it’s been incredibly painful, and I never seem to develop the callouses I’d need to make continued bare-finger shooting feasible. That’s why I, and many many people (including Olympians), use some type of device to protect the fingers.
These are those most common tools that people use to protect their digits:
Finger Savers. These are little rubber thingies that look like this. They’re made of a flexible rubber and you set them on your bow string at the nocking point (the nocking point is spot on your bow string where you put your arrow, as we discussed in Step #2). You wrap your fingers around the finger savers and then draw.
You’ll often see these on the rented bows you get at the archery range. These are excellent tools for beginners, and if you’re just starting out and renting bows, they’ll help you a great deal. However, most people, when they get serious about archery, ditch the fingers savers and set up a proper nock on their bow string, which is a little piece of metal that reminds the archer of the exact spot where the arrow attaches to the bow string. When you make the switch from finger savers to nock locators, you’ll need to use gloves or finger tabs (for a recurve bow) or a release aid (for a compound bow).
Gloves or Finger Tabs. These are most common for use with recurve bows. Gloves usually have three fingers and are made out of leather; finger tabs look like the following:
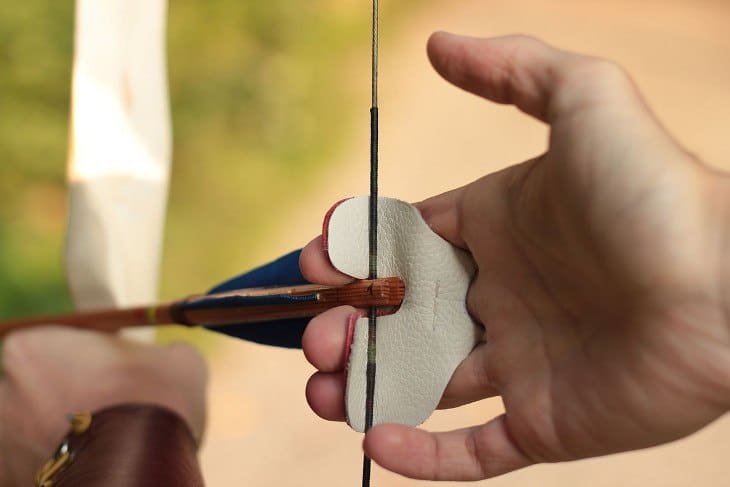
Which you decide to use is up to you; Olympic archers seem to prefer finger tabs, but many people (including yours truly!) prefer gloves. It’s totally up you and what you find more comfortable.
Release Aids. Many archers—particularly compound bow users—rely on instruments called “release aids” when they draw the bow. These are really cool devices that allow archers to get a very clean release when they let go of the bow string. Fingers—and even gloves and finger tabs—can bend the string and interfere with an arrow’s trajectory, and as you would imagine, trajectory is important—especially if you’re a hunter using a compound bow.
There are different types of release aids, including wrist straps, finger releases, and automatic releases, and I’ve detailed how to use those devices in other posts, so I’ll skip that here, but if you’re curious, here’s an example. If you’re just starting out, this is simply a note to let you know what they are and why they’re used.
That’s That
So, that’s the basic idea behind the draw grip: place your fingers’ first joints on the string to create a hook, with the pointer finger above the arrow and the middle and ring finger below the arrow, and keep the thumb low and the pinky out of the way, and you’re good to go. Nothing too complicated. As with all things in archery, you want to find what works for you, and then reproduce it time and time again.
Next up: Step #4! Your bow hand and grip!